Star Wars Armada
Battle Report 3 – Observations and Learning
I thought I’d give a summary of things I’ve learned from my previous couple of battles where I experimented with some new upgrades.
For the battle report, see : Battle Report 3 – We’re Jammin’ (Again)
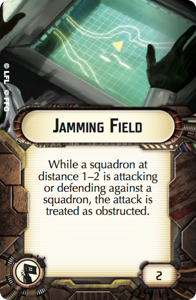
Jamming Fields
From initially thinking that this was a pretty duff upgrade, I have changed my mind and had fun experimenting with it. You need to consider Jamming Fields when you put together your squadrons during fleet design. I have come away with the following learning:
- Your own “counter” attacks will be reduced or nullified by a Jamming field, so for example, Dengar isn’t that useful around a Jamming Field
- Enemy counter attacks are also reduced which is a great way to degrade the enemy’s squadrons for little cost. Given I was planning to use this card to extend the life of my squadrons, suppressing enemy counters is very useful.
- Keeping your transports alive is key while the squadron game is still progressing. Bright Hope for Rebels or Minister Tau with Electronic Counter Measures for the Imperials help here – I found transports don’t get attacked at all when there is a big risk of little or no damage to them.
- Squadrons with high movement (either natural or boosted by Vector or an All Fighters Follow Me, for example) allow you to rapidly move away from the Jamming Field and attack enemy squadrons who are also outside the field. When it’s the transport with the Jamming Field that does the squadron activation, often the transport will then move up and the enemy squadron will be in range of the field, meaning that your squadron will benefit from the field with any counter attack.
- The TIE Phantoms (and even more so with Whisper) are able to navigate in/out of the field with their bonus moves. Combined with using the station to heal up, Phantoms are able to survive that much longer around a Jamming Field.
- Boosted Comms helps you keep your squadrons in range for activation when you move out of the Jamming field to attack distant squadrons.
All in all, using Jamming Fields is quite a complicated affair, but I discovered how to use them as i went along and felt that they made a valuable contribution to the game. They are cheap to deploy and quite easy to design around, especially once you know some of the subtleties around how to get the most out of them.
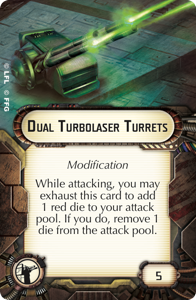
Dual Turbolaser Turrets
I found Dual Turbo Lasers got a reasonable amount of usage during my last couple of games. Combined with a concentrate fire re-roll they can give you that extra bit of bad-roll mitigation to get the best out of red dice; 5 Points feels a little expensive but not having to exhaust the card is good, especially if you are good at getting into double-arc positions where you can use it twice in an activation.
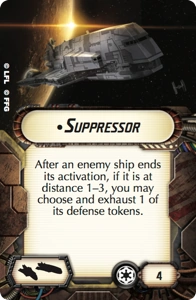
Suppressor
I found suppressor’s ability got activated a number of times in my last couple of games, making the card’s 4 points usually worth the cost. Anything that wears down defense tokens is good in my book. When using the Suppressor title, you need to keep your Gozanti alive, and hence putting the title on a Gozanti with Minister Tau & ECM works well.
One note is that it’s easy to forget to use the Suppressor ability because it doesn’t happen when you are in control of the game – it’s when an enemy completes a move. I often only remembered to use the ability when I was considering what to activate next, when i thought “oh yeah, there’s Suppressor”; my opponent was kind enough to let me apply its effect as nothing had happened since his ship ended its move.

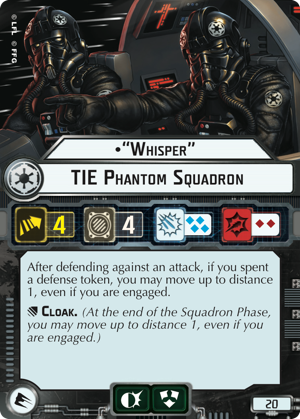
TIE Phantoms and Whisper
It has taken me a long time to get around to testing out the Phantoms; I have always considered them to be too expensive to field, considering that for just 2 more points you could field 2 TIE Fighter squadrons. My intention in my last two battles was to use their cloak ability to allow them to disengage from fighter combat and attack ships, but this has not really worked out yet as my opponent has always had too many squadrons to deal with.
When I’ve used their two red dice for anti-ship duties I’ve been able to do some damage; I found their cloak ability a little useful to do some re-positioning, but mostly I used it to get them some first-aid from the space station. Because of this it’s worth considering whether you want to be first or second player when deploying Phantoms; being second player and being able to deploy the station could allow you to heal these guys up more often simply because you can achieve fighter superiority around the station.
At 20 points, I found Whisper to be good enough value – he’s able to get himself out of trouble with his super-cloak power, and is able to stay alive with souped-up station-healing and his two defense tokens. If you are fighting around the station then Whisper is a right pain to take out. I expect Whisper will become a staple squadron of mine in the future.
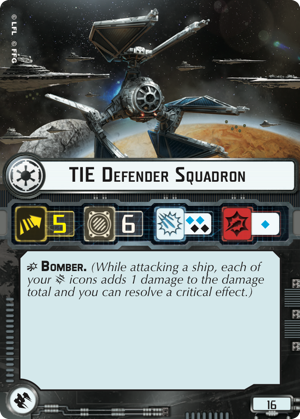
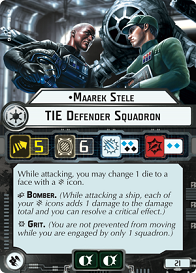
TIE Defenders and Maarak Steel
As with TIE Phantoms, I’ve not flown with TIE Defenders before, preferring to go with cheaper squadrons or getting defense tokens with the unique squadrons if I’m going to pay such a high points cost. I wasn’t disappointed with TIE defenders; their 5 speed and extra staying power gives them great all round utility, and if they survive the squadron game they are still able to contribute with being a bomber, albeit with just a single blue dice. I didn’t find Maarak Steel especially brilliant, but i think he needs more air-time to get a proper evaluation.
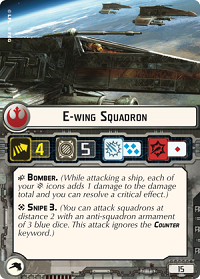
E-Wings
As a mainly Imperial player, I like seeing E-Wings out because they have a relatively high points cost and I tend to view them as point-scoring-fodder for the Imperial air force. I’ve noticed that once the squadron melee gets underway and the battle field turns into chaos, the ability to have Snipe at range 2 allows these guys to make use of their attack in the squadron phase when non-Sniper squadrons would not be able to act. In this way, I think they are more resilient to being without squadron commands, since there is more chance of them being able to shoot at the enemy because their range 2 snipe attack means they don’t have to move.
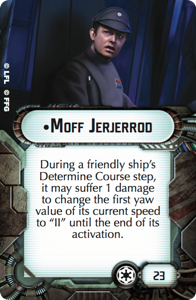
Moff Jerjerrod
I’ve been fielding Jerjerrod for most of my games since SpacePotato and I started using the wave 5 stuff. He’s brilliant. I find myself using his ability numerous times per game. He stops Victory Star Destroyers from being too slow and unwieldy, and he helps get maximum value out of Imperial Star Destroyers and their fearsome front arc.
You can plan for his use somewhat – and he makes the navigate command a bit redundant if you’re OK to add the odd engineering command or token into the mix (I think this applies to larger ships who might tend to be OK flying at the same speed once the game gets going; Ozzel is perhaps more useful for Gladiator Star Destroyers and Raiders, especially as they are much more fragile and don’t want to take the damage that Jerjerrod would give them).
![]()

Rebel Transports and Imperial Gozantis
I do like the utility and activation bonus that cheap transports bring. I noticed how their longevity is increased with the title Bright Hope (Rebels) or Minister Tau & ECMs upgrades (Imperials) simply because they get attacked so much less frequently when they host these upgrades. Bright Hope is much more fighter-proof than a standard transport, and a Tau & ECM Gozanti can be so much more aggressive because guaranteeing that scatter being available makes single attacks in a round basically pointless, even from monster front arc shots from a Liberty.
Both SpacePotato and I make use of the more expensive version of the transports, using their enhanced firepower to throw out additional attacks. The red dice on the Gozanti is especially useful for shooting at big Rebel ships that don’t have an evade token.