Star Wars Armada
Battle Report 2 – Jerjerrod vs Madine
![]()
Battle Participants
A battle between Jerjerrod and Madine, with me (SpaceTriangle) taking control of Imperials, and my good friend SpacePotato taking control of the Rebels.
We are making our way through the waves of expansions and are currently up to wave 5.
Trying New Stuff
I’m experimenting with a couple of new things that I’ve not tried before. Firstly, there are some TIE Phantoms out on the pitch, and secondly, I’m running a couple of Gozanti’s that are both equipped with Jamming Fields. More on this later.
SpacePotato is running an E-Wing heavy squadron component and backing this up with a Quantum Storm Bomber Command.
Rebel Fleet
Commander: General Madine
MC80 Star Cruiser (96)
GR-75 Combat Retrofits (24)
MC30c Scout Frigate (69)
Squadrons:
130 Points
Total Points: 395
Imperial List
Commander: Moff Jerjerrod
Gozanti Assault Carriers (28)
Minister Tua (2)
Jamming Field (2)
Suppressor (4)
Electronic Countermeasures (7)
43 Points
Victory I (73)
Moff Jerjerrod (23)
Skilled First Officer (1)
Flight Controllers (6)
Boosted Comms (4)
Dual Turbolaser Turrets (5)
112 Points
Victory I (73)
Skilled First Officer (1)
Boosted Comms (4)
Dual Turbolaser Turrets (5)
83 Points
Gozanti Assault Carriers (28)
Jamming Field (2)
Expanded Hangar Bay (5)
35 Points
Squadrons:
2 x TIE Bomber Squadron (18)
Gamma Squadron (10)
Whisper (20)
3 x TIE Phantom Squadron (42)
JumpMaster 5000 (12)
Major Rhymer (16)
Black Squadron (9)
127 Points
Total Points: 400
Fleet Design and Strategy
Rebels
SpacePotato aimed to use the souped-up manoeuvrability that Madine gives to give the Mon Karren and MC30 extra getting-round-the-back power, to be supported by a lot of multi-role squadron power.
Deploying E-Wings gave both anti-squadron and anti-ship capabilities. With a good speed of 4, they can act as interceptors and hopefully get a first strike against enemy squadrons.
Hera Syndulla in Ghost was there to reduce the need for squadron commands by providing 2 squadrons with Rogue.
Imperials
So this was an experiment. We always declare our fleets as “experimental”, giving us a plausible excuse if we get our asses kicked, but really, this list was experimental.
The theory was to use Jamming Fields to reduce the damage to my squadrons, letting the TIE Phantoms survive longer and hopefully dodge out and attack attack ships. I really wanted to try out some of the more exotic stuff and see if they could be made to work.
Supporting the TIE Phantoms were TIE Bombers with a JumpMaster that provided Intel; I’ve never really got this combination to work before but I figured that the Jamming Fields would also complement the bombers by keeping them alive longer too.
Rhymer was there as a utility to help get more shots in on ships.
One Gozanti was equipped with Electronic Counter Measures because I wanted to ensure that some of my close-up squadron activations stayed around for longer.
The Victory Star Destroyers were there to provide some staying power and something to shoot at, and to provide some threat themselves. One VSD was equipped with Flight Controllers so that I could enhance my squadrons’ first strike if I got the opportunity, and it would also offset some of the negative effect that Jamming Fields would have on my own squadrons’ attacks.
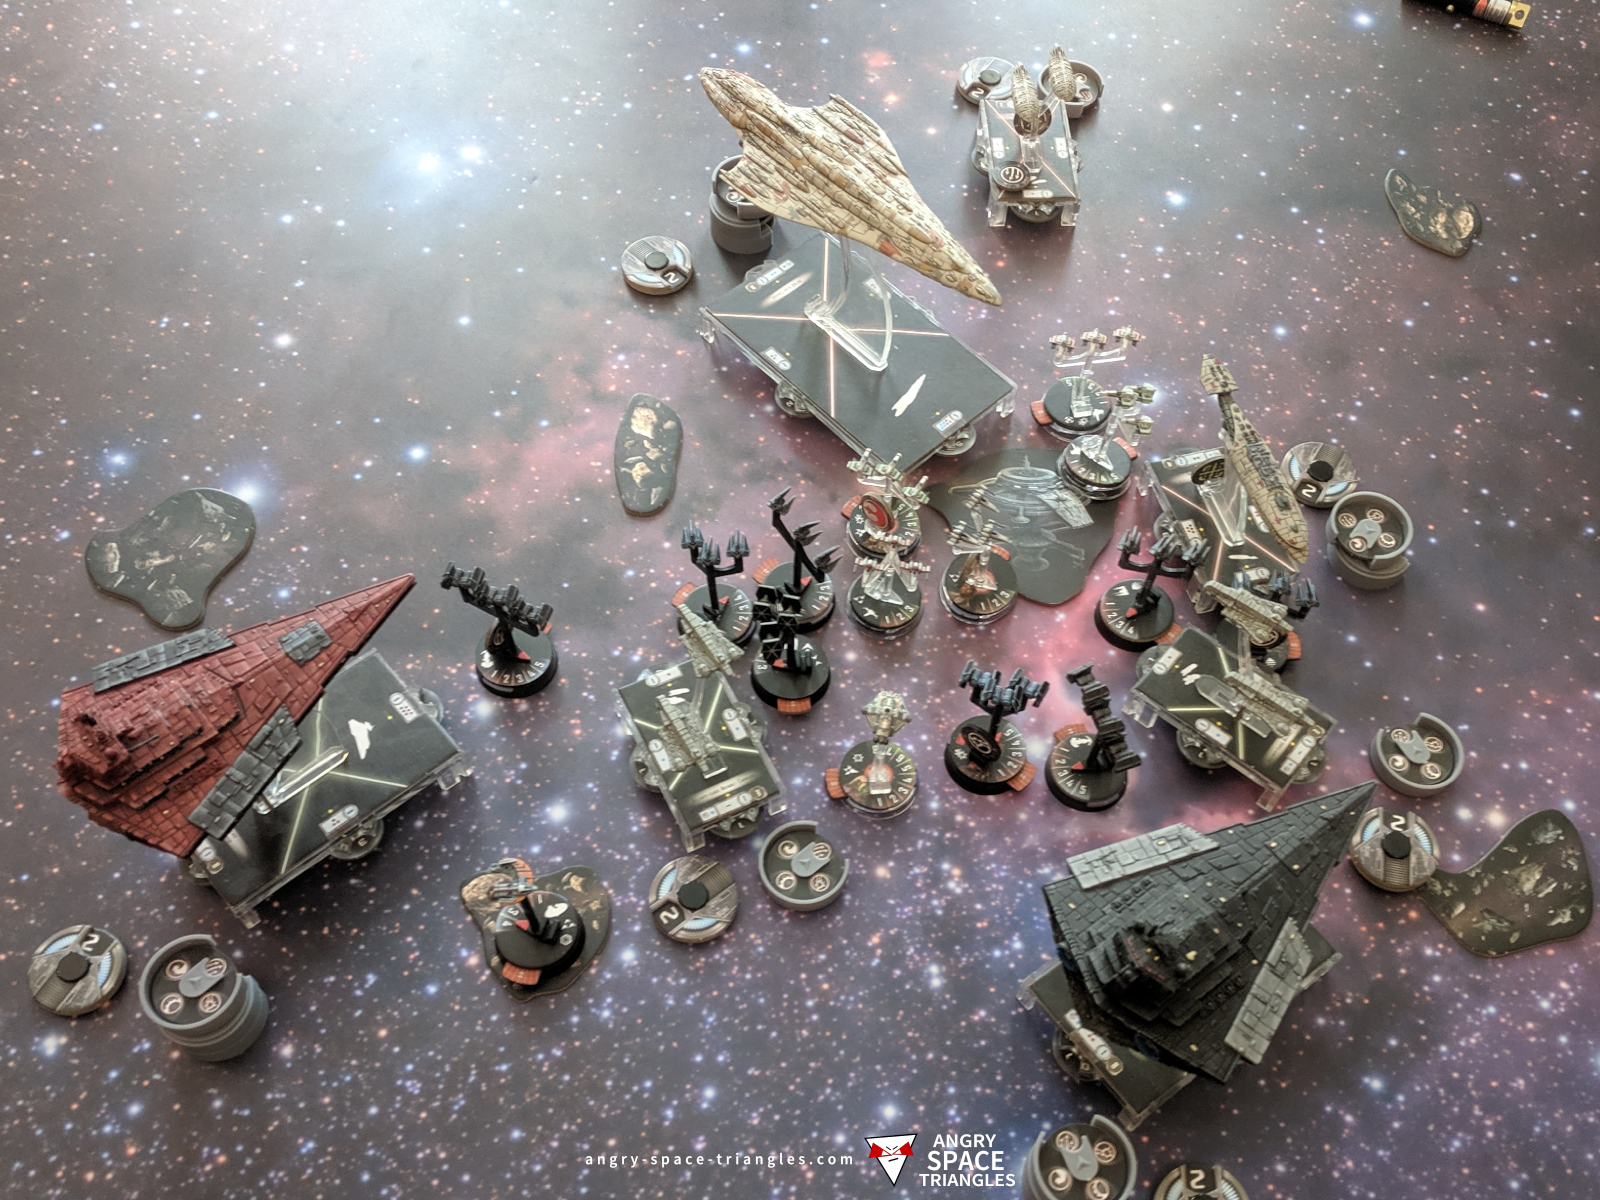
Objectives and Fleet Deployment
SpacePotato chose First Player as he had a higher bid, and he chose “Fleet Ambush” as the objective. His other two choices were “Superior Positions” and “Precision Strike”, both of which would actually suit his fleet as it was squadron heavy, but Fleet Ambush was more interesting.

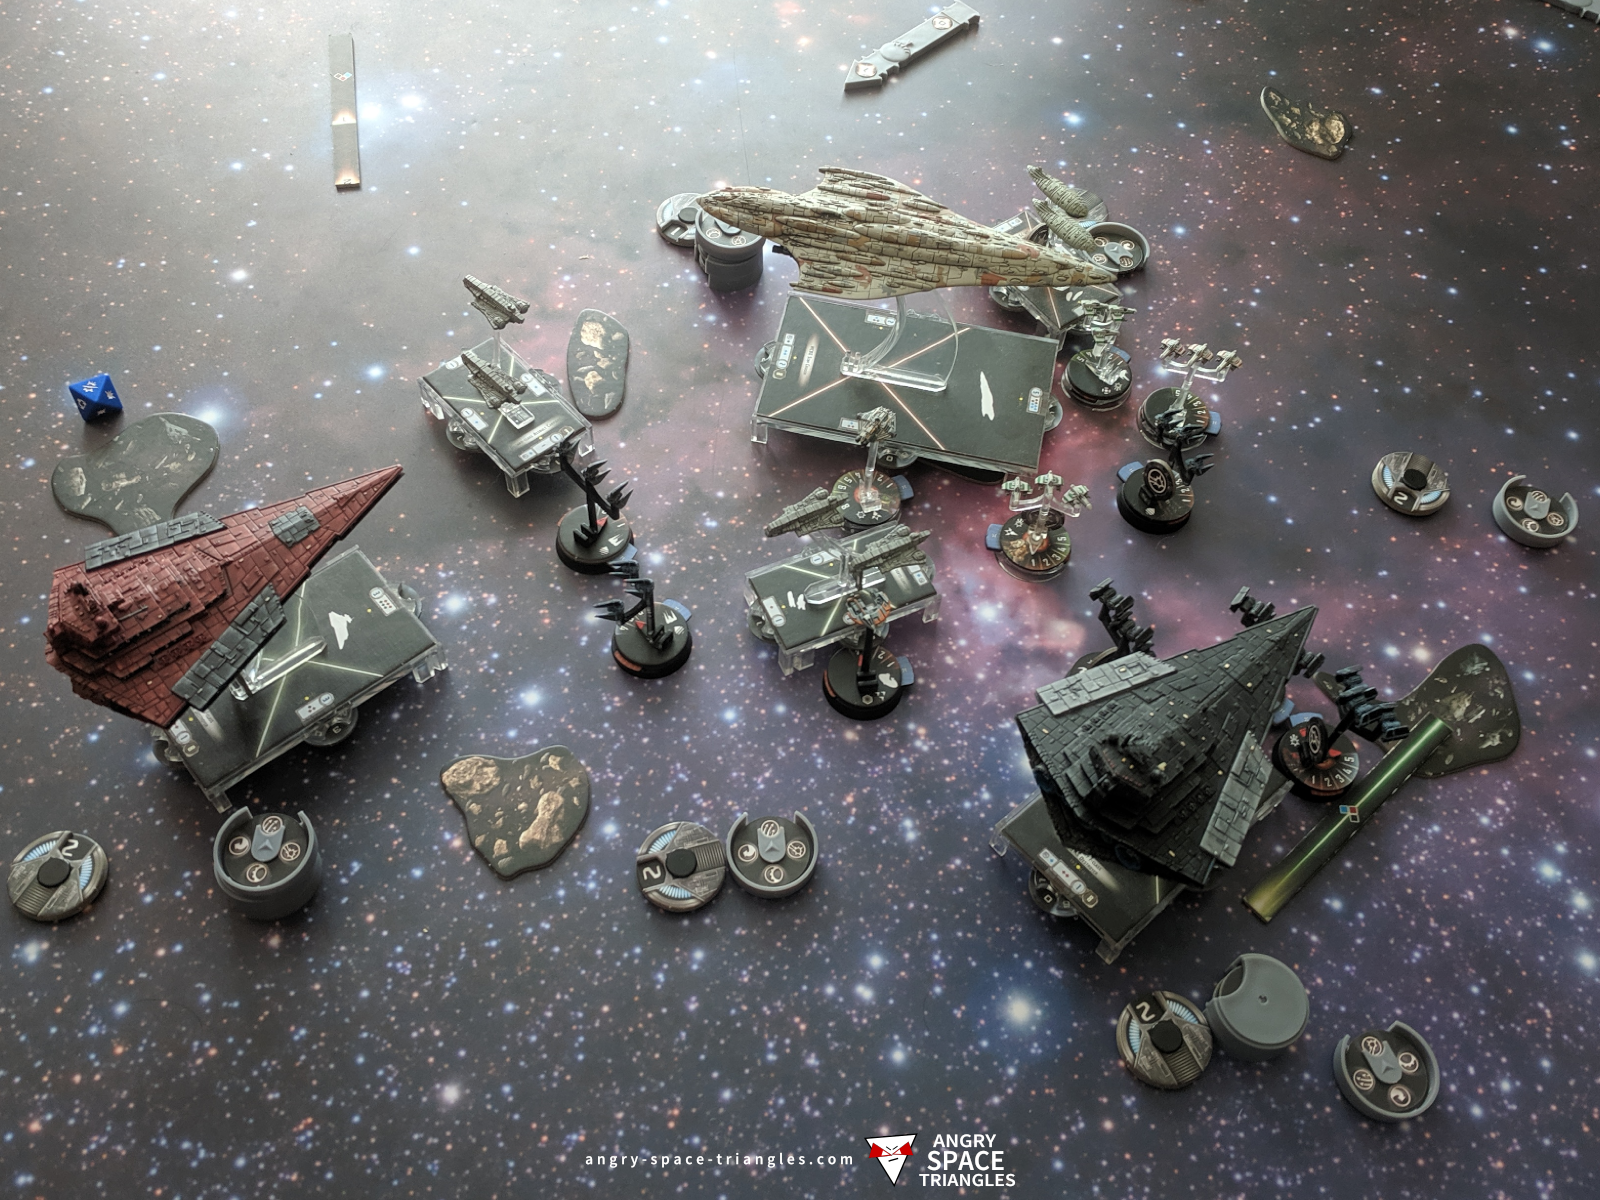
Turn 1
Interception to Turn 1
The great thing about playing Fleet Ambush is that the action usually starts immediately on turn 1. Whisper and a vanilla TIE Phantom were activated by Suppressor which flew in to attack the E-Wings, destroying one. A bunch of Rebel fighters were snuggling up to the space station, preventing engagement. This was overlooked by me during obstacle placement – I didn’t consider that the obstacles would be providing SpacePotato with a platform for launching his bombers from, and avoid the risk of getting tied up with engagement to my squadrons.
The MC30 moved up to threaten Suppressor after flakking the Phantoms, dealing a damage to each.
The Gozanti pushed up the TIE Bombers to start depleting shields on the MC30 which had move forward to try and flank / get behind the Imperials, scoring 2 damage. The Gozanti also had a long range pop at the Mon Karren, taking down a shield.
Mon Karren moved forward but fortunately wasn’t in range to do much else, but now was in firing range of Suppressor.
The red Victory sent the remaining two TIE Phantoms and Black Squadron forwards and attacked the second ball of Rebel squadrons, taking out two Z-95s with the aid of Flight Controllers. The Black Victory Star Destroyer took an obstructed long range shot at the MC30 which evaded the damage.
Squadron Phase
The remaining Z-95 rolled 3 damage against a TIE Bomber, which was subsequently destroyed by Corran Horn. I was afraid to move the Jumpmaster into range of the Rebel fighters as it was my key to keeping the TIE Bombers active. It’s worth noting here that I totally forgot to use the TIE Phantoms’ ability to move at the end of the squadron phase, even if engaged. I’ve no idea if it would have been useful, but goes to show how easy it is to overlook such things when there is so much going on.
End of Turn 1
The board state was already quite a mess. A huge squadron conflict was due to play out, and the capital ships were now in range to start taking part. I was afraid that the black VSD would not survive long enough against the combined might of an MC30 and Mon Karren for the red VSD to catch-up.
Turn 2
The MC(30) Gets the Party Started
SpacePotato’s MC30 began turn two by attacking the black Victory Star Destroyer, scoring 3 damage plus an extra 2 shield damage from Assault Concussion Missiles. Fortunately the VSD was out of the side arc; the remaining attack was used to flak fighters. Unfortunately for the MC30, it ended its move on a debris field, right in front of the VSD.
Activated by the Gozanti, the Jumpmaster freed up a TIE Bomber which flew on to wear down the MC30. The Gozanti had a another shot at Mon Karren, scoring a double hit that was braced and redirected. At Speed 2, the Gozanti was already heading out of the action as it flew alongside the Mon Karren.
Initially, the Rebel transport was deployed just out of range of the Rebel squadrons to be able to push any squadrons. Now though, it activated two E-Wings which attacked Whisper (who scattered all the damage) and a TIE Phantom, which was destroyed. It moved forward, landing near enough to Suppressor for it to have to spend a defence token (scatter).
The MC30 was softened up further by some TIE bomber attacks which were activated by the black Victory. It then succumbed to the follow-up front shot from the VSD, receiving just enough damage to blast it into bits. With the help of Jerjerrod, the black VSD attempted a sharp turn and rammed Suppressor, effectively keeping it in place and thereby avoiding getting closer to the Liberty which was approaching from its left. I figured that I didn’t want it out of the fight and facing the wrong way with Mon Karren bearing down.
Speaking of Mon Karren, it still didn’t have much too shoot at, fortunately for the Imperials. It did successfully flak TIE fighters, dishing out 5 damage between 3 squadrons before shuffling forward onto the space station.
Suppressor activated Black squadron and a TIE Phantom, and then put out some flak. The red Victory Star Destroyer took a long range shot at Mon Karren’s relatively weak side and caused an ‘Injured Crew’ critical hit, forcing Mon Karrren to discard a defence token. It then moved forward to bump the Gozanti, effectively keeping it in position instead of moving forward and closing in on the Mon Karren. In hindsight, I should have thought about this before moving the Gozanti to where it was; the priority should have been to get the red VSD into the fight as soon as possible.
End of Turn 2
The destruction of the MC30 gave the Rebels a big activation disadvantage now which would be made worse because SpacePotato was also First Player. Both Imperial Gozantis were heading in the wrong direction, but the Victorys were looking like they were still in the action and facing in sensible directions, something that is much easier to do with Jerjerrod as the Imperial Admiral. I tend to fly with Ozzel or Jerjerrod often these days as they really help counter the Imperials weakness in its manoeuvrability.
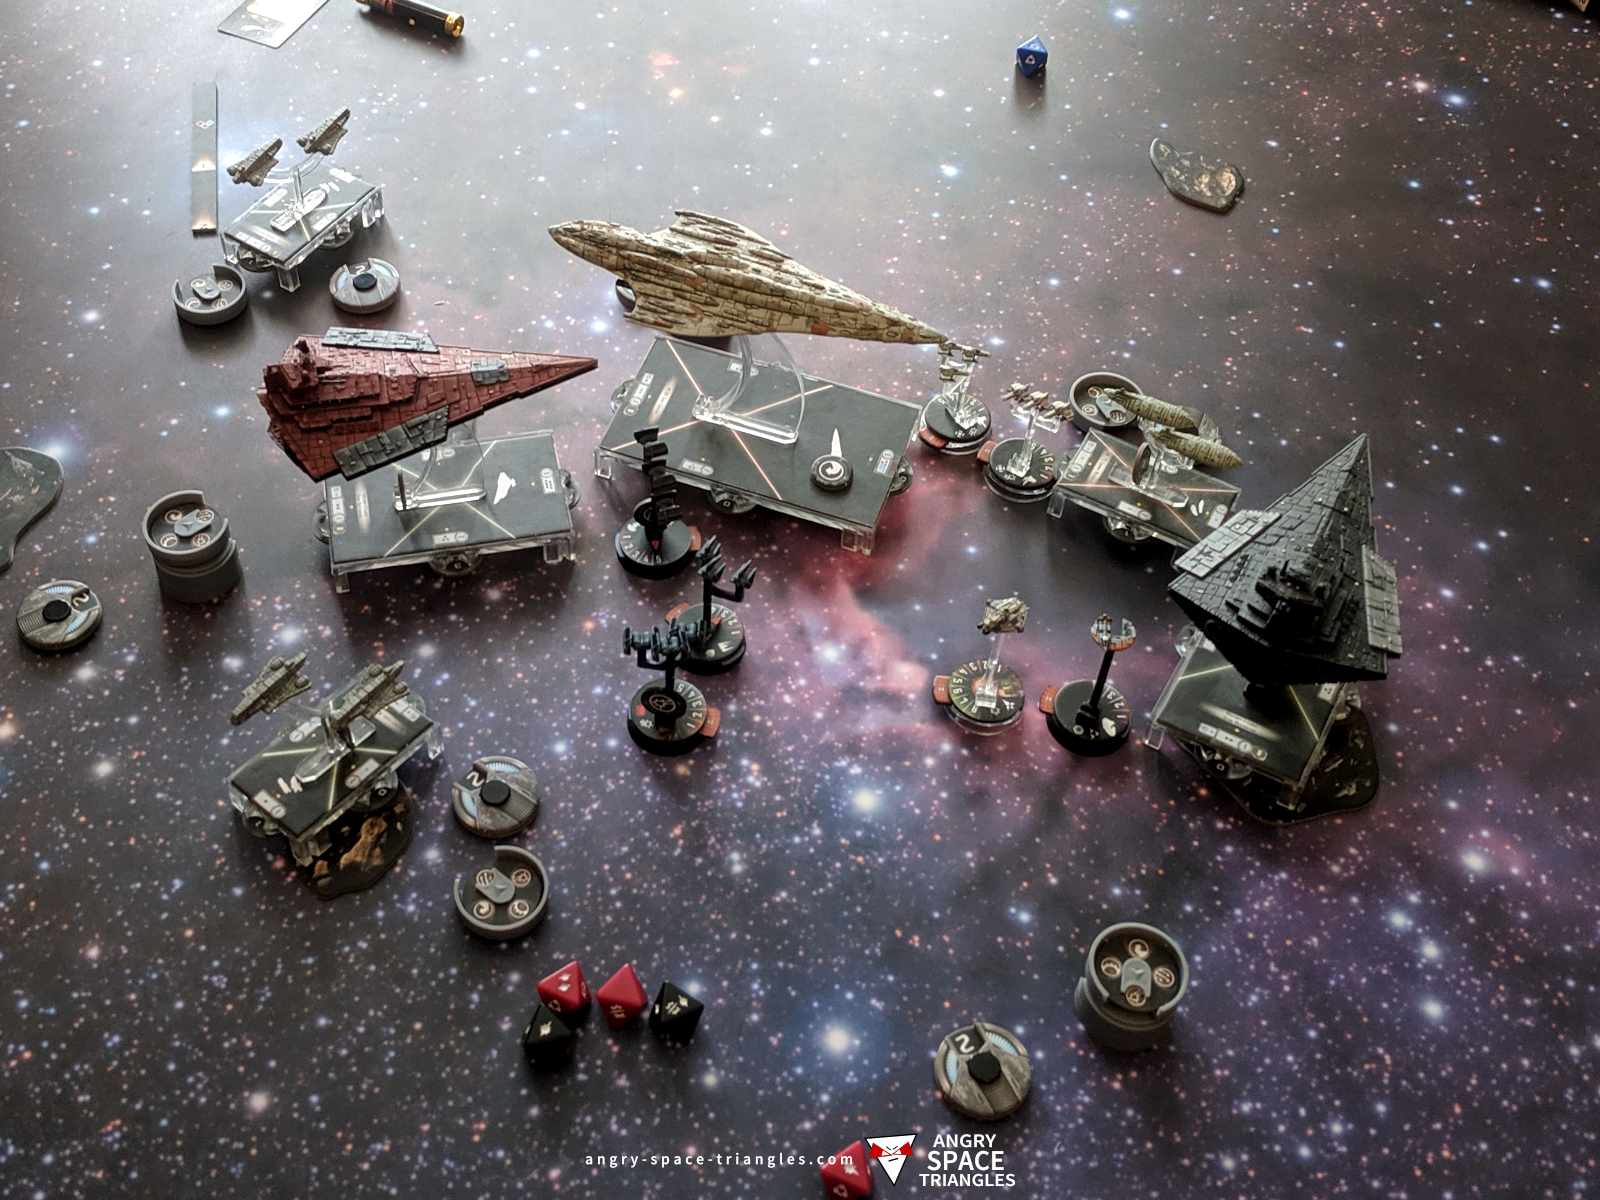
Turn 3
In Mon Karren’s Double Arc
SpacePotato is far more skilled than I at getting his ships into double arcing positions. As First Player, he was keen to take advantage of this with Mon Karren.
The first attack from Mon Karren’s side into the front of the black VSD resulted in 3 damage, all of which was taken on shields with the help of a redirect . The second attack from the front arc of the Mon Karren only caused 3 damage to the VSD (from 7 dice), but did cause a critical hit. This was ‘Targeter Disruption’ which stopped the VSD from resolving critical hits on its own attacks.
SpacePotato decided that it would be better to try and allow the black Victory to move in front of it, rather than for the Mon Karren to move in front of the Victory, so it made its move to ram Quantum Storm, effectively keeping the Mon Karren in place. This ended its move near Suppressor again, so it had to spend a brace token, but was also on the station, so it repaired a damage.
Quantum Storm had a Squadron command and used it to activate Corran Horn and Hera Syndulla who, between them, polished off a TIE Bomber. It then put out a damage on Whisper before moving to a position directly in front of Mon Karren.
Suppressor on the Rocks
Suppressor used its squadron command to activate the Jumpmaster and Whisper who put out 1 damage to Ghost and 1 damage to Corran Horn. It then had a pot shot at Mon Karren for 1 damage, before moving off… onto an asteroid, earning it a critical hit. It could no longer attack at long range.
The red VSD activated a TIE Bomber and 2 Phantoms to attack the Mon Karren which now had its side vulnerable with no shields. 3 Squadrons did a total of 5 damage thanks to some fortunate red dice rolls. The Mon Karren had to burn its redirect to not take more hull damage, spending both rear and front shields in the process.
Last to act was the black Victory Star Destroyer which fired a close range shot from its front arc into the Liberty, doing another 2 hull damage it then moved forward and landed on the debris field, taking 2 hull damage itself.
Squadron Phase
SpacePotato’s E-Wings assaulted the TIE phantoms near them, destroying one squadron and damaging another.
End of Turn 3
Mon Karren was looking like it was in a bit of a pickle; even with First Player, it would be hard to get away from the red Victory that was rapidly approaching from behind. The squadron game was tipping in favour of the Rebels at this point as they had more anti-squadron firepower left with 2 E-Wings and Ghost, vs 2 Bombers and Whisper.
Turn 4
VSDacide
Mon Karren started turn 4 with an awesome front-shot to the black Victory’s side, rolling 8 damage and an accuracy. With the brace locked down, 8 damage destroyed the Victory. Unable to manoeuvre enough, the Liberty bumped Quantum Story and stayed in place. This was going to be a problem….
Libertyacide
The red Victory took revenge very seriously, getting 6 damage out of 6 dice into the Liberty’s rear, which was enough to destroy it since it no longer had any defence tokens or shields to play with.
At this point, SpacePotato conceded – the game had taken over 4 hours up to this point! Victory for the Imperials.
Battle Report Notes and Observations
Using the TIE Phantoms
So, the plan for the TIE Phantoms to avoid squadron combat if they could didn’t really pan out. When your opponent has a squadron heavy list, your own squadron plan may well become redundant as you are forced to respond to what the opposition is doing.
In this case, the TIE Phantoms were required to do anti-squadron duties rather than attack ships.
Forgetting the Jamming Fields
It’s hard to truly evaluate the effect of Jamming Fields since we forgot to apply them to a number of Rebel attacks on the Imperial squadrons. Taking this into account, I felt that they came into use many times and warrant further experimentation.
Victorys and Jerrjerod
Victory Star Destroyers are so easy to out-manoeuvre if they don’t have something serious to improve their turning power. Jerjerrod does just that! VSDs have sufficient shields and engineering power to take the single damage that Jerjerrod does in exchange for the double yaw at speed 1. I used this ability a bunch of times during this match to get my VSDs into position (or stopping them get terribly out of position!)
One thing I’ve noticed is that the engineering command becomes your navigate command: you use it to retrospectively fix damage that you incurred from using Jerjerrod in previous rounds.
Gozantis
The Gozanti Assault Carriers (the 28 point ship as opposed to the 23 point ship) were worth the extra points I paid for them in this game as several times they were able to use the extra range of both the front arc and their anti-squadron armament.